
I have been on a quest to come up with the perfect no-spread sugar cookie recipe. I tried different extracts, baking powder, baking soda, brown sugar…lots of experiments! Through all these experiments, I came up with a recipe that gets rave reviews every time! They’re soft and moist, you don’t need to chill the dough, and they don’t spread. Win, win, win!
This post may contain affiliate links. See our disclosure here.
Now that I have the recipe I want, I’ll be using it as my base recipe to create different flavors. I’ll share them with you as I figure them out. Just off the top of my head, I’d like to come up with a lemon, chocolate, red velvet, carrot cake and pumpkin spice recipe. I have my work cut out for me! (No pun intended, but it works!)
Let’s talk flour…
When I first came up with this recipe, I was living in Phoenix. 3.5 cups of flour was the perfect amount for my recipe. Then I moved to Houston last summer and the first time I made cookies, they weren’t coming together the same. 3.5 cups wasn’t quite enough flour. What was going on?! I added another half a cup of flour and they were back to the perfect consistency. THEN, I made some cookies a few weeks ago in January on a cold weekend and 4 cups was too much flour! The dough was a little dry. Really?? I cut it back to 3.5 cups on the next batch and it was perfect.
The moral of the story is, temperature and humidity play a big role in a cookie recipe. Start with 3.5 cups and mix it well. If it pulls away from the sides and balls up, you’re good to go. If it’s not quite coming together, add another half cup.
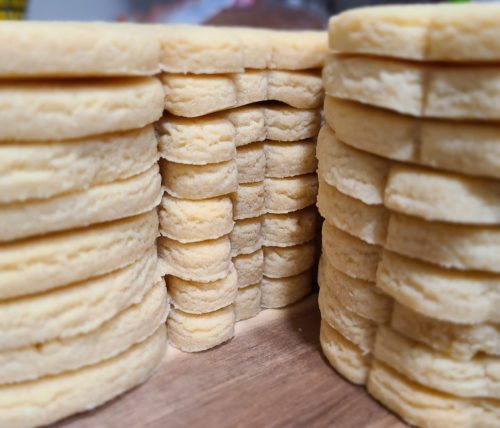
No spreading!
Aside from the flavor and soft bite, what I love about this recipe is that it doesn’t spread. You can place cookies close together on the cookie sheet and not worry about them. Here’s a picture of a cookie out of the oven with the cutter sitting on it, just to show you.
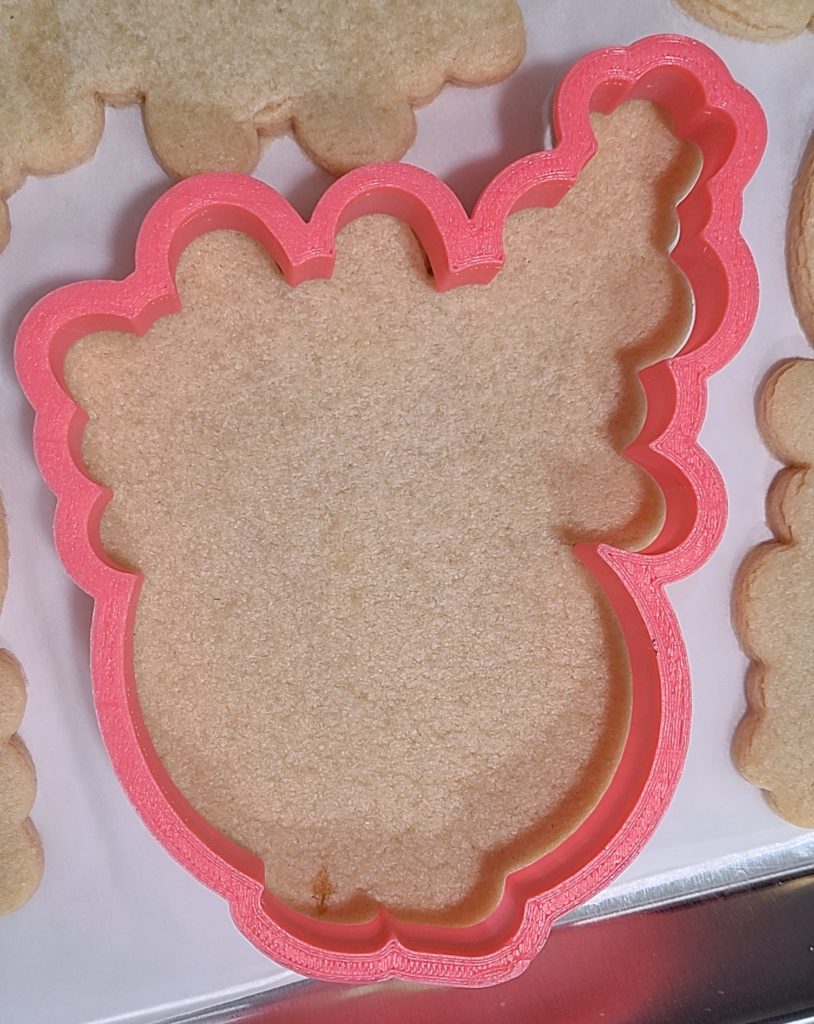
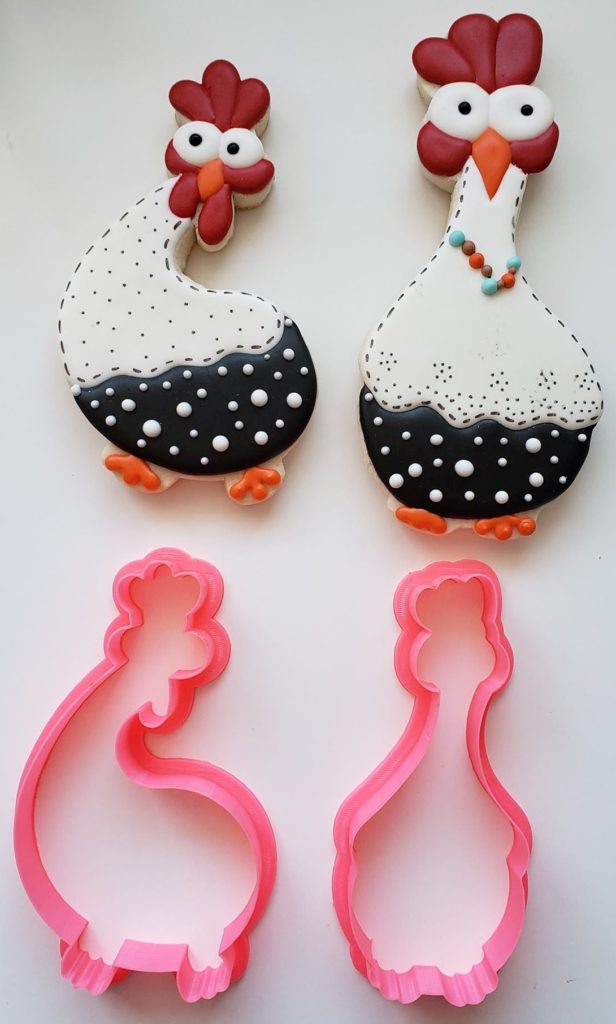
What on earth is this cutter, you ask? It’s one of my all time favorites! It’s from Manny’s Sweets and it’s called Amelia’s Mom. 🙂 Want to see what it looks like decorated? Wait for it…
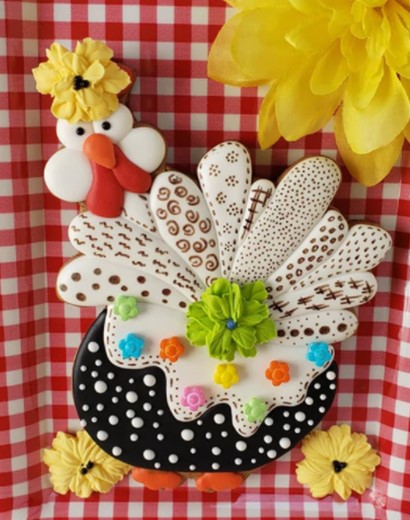
This is not my photo! It’s from the Manny’s Sweets website. Someone brilliant came up with this design. And below is another version from their Facebook page. I’m so in love with this cutter! I baked some that are sitting in my freezer waiting for some Easter inspiration.
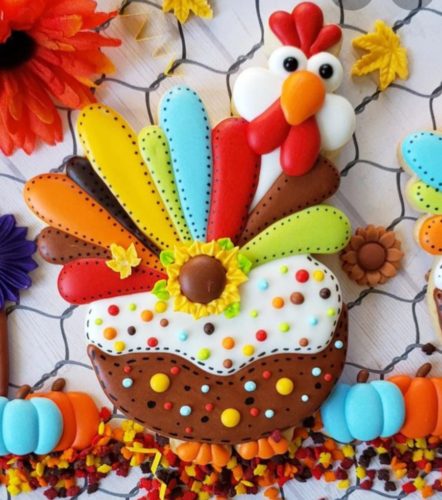
And here’s a couple more from their chicken collection that I can’t wait to decorate. They just make me happy! Again, not my photo. It’s from their website.
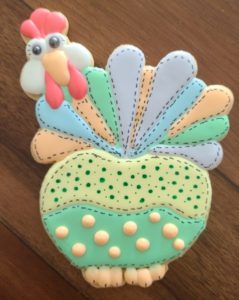
Here’s one I decorated for Easter…
Now let’s talk extract vs emulsion…
What is an emulsion? To be honest, when I was playing with different recipes and exploring ingredients, I didn’t know what an emulsion was. I had always used extracts. The simple difference is, extracts are alcohol based and get diluted in high heat, whereas emulsions are water based and keep their flavoring better. I was surprised to see that emulsions are pretty thick since they’re water based. But once I started using them, I was sold. Now, I can’t say I love every flavor. I tried maple, and didn’t like it at all. Maple extract was a better way to go for me. But I’ve found some emulsions I love. The brand I use is LorAnn and I just order it from Amazon. My go-to flavor of emulsion is Butter Vanilla. It’s amazing! But I also use some good ol’ vanilla extract in the recipe as well.
Other things you’ll need…
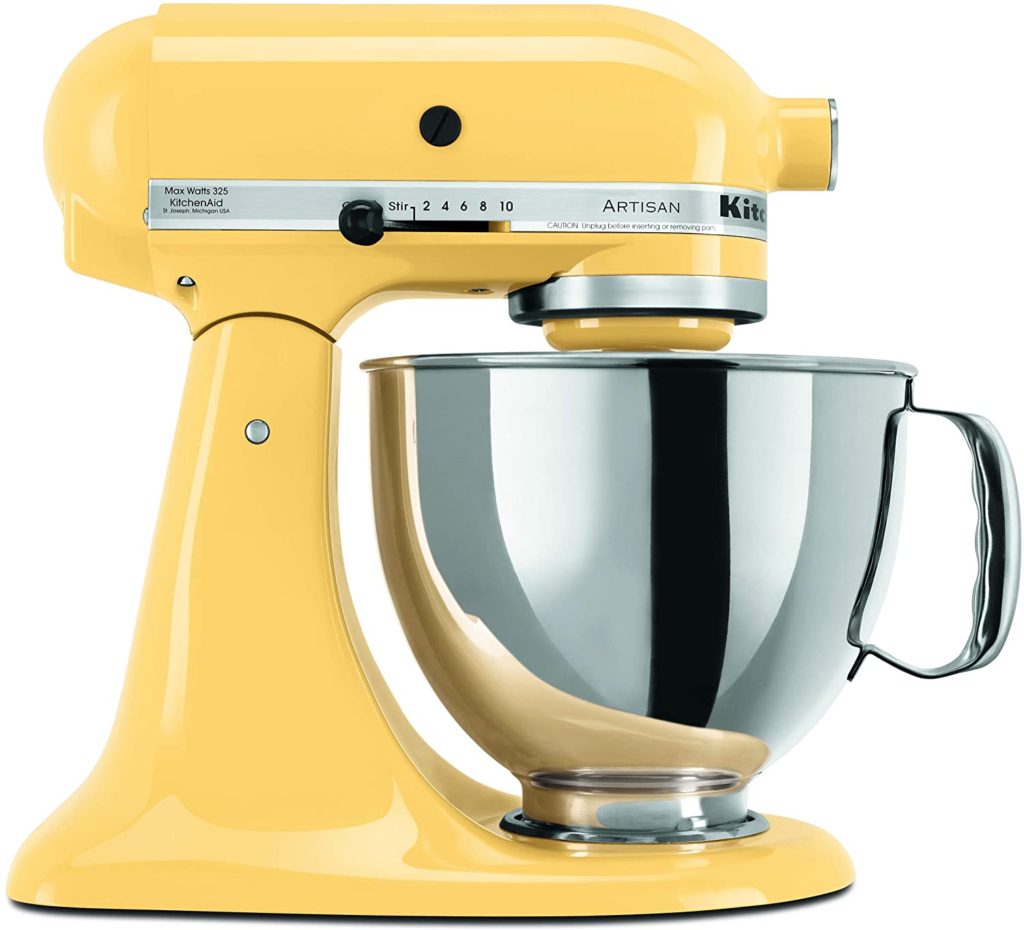
It would be pretty taxing for a hand mixer to mix up a batch of rolled sugar cookie dough. It’s much better to use a stand mixer. I have the Kitchenaid 5 qt Artisan. It’s not an inexpensive machine, but I was fortunate to get mine using my American Express points. I love my points!
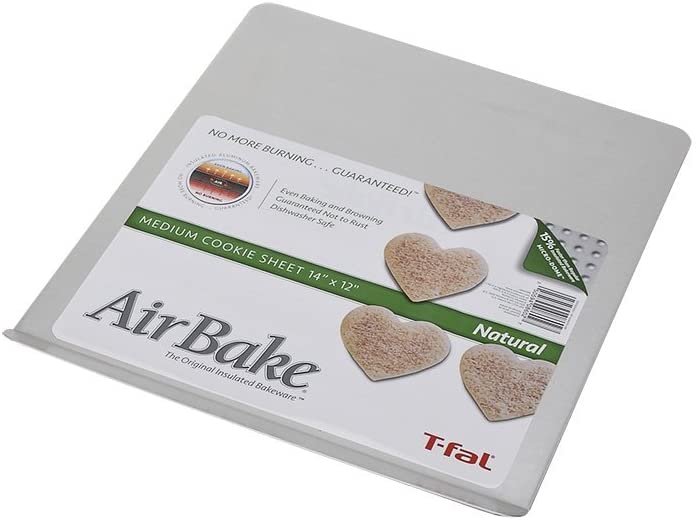
I’m very fussy about my cookie sheets. Years ago I purchased these Airbake cookie sheets and they have never let me down. I have them in 3 different sizes! This large one fits alot of cookies on it!
I am a parchment paper girl. It has so many uses, including lining my cookie sheets and rolling out my cookie dough. No need to flour a surface. Just put your dough between 2 sheets of parchment paper and roll!

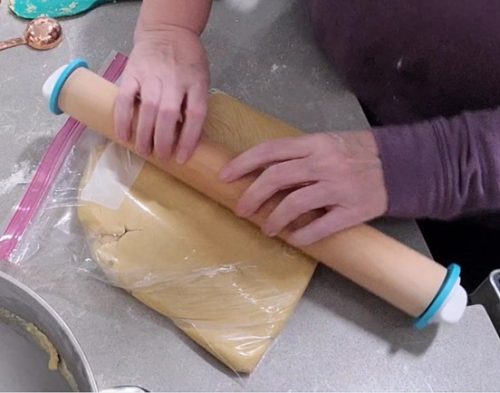
When I started my sugar cookie decorating hobby, I needed a rolling pin. I was looking through some cookie Facebook groups for recommendations, and everywhere I looked, this rolling pin came up. It’s kind of brilliant. You attach a ring to each end of the rolling pin and then when you roll out the dough, it rolls to the thickness of the ring. It’s a way to get a perfectly consistent thickness for your cookies, which allows them to bake evenly. And you can choose what thickness you prefer. I personally prefer 1/4 inch thickness.

Back to the recipe…
My recipe is simple, using ingredients that you probably already have, with the exception of the emulsion. But I highly recommend getting some.
Here’s what you’ll need…
- 2 sticks of salted butter
- 3/4 cup light brown sugar
- 3/4 cup granulated sugar
- 2 large eggs
- 2 tsp butter vanilla emulsion
- 1 tsp vanilla extract
- 3.5 cups all purpose flour
Here’s what you’ll do…
- In a stand mixer, blend the butter until creamy
- Add the light brown sugar and granulated sugar
- Mix until combined and then add the 2 large eggs
- Add in the 2 tsp butter vanilla emulsion and 1 tsp vanilla extract
- Mixture should be well blended
- Add 1 cup of flour and mix thoroughly
- Add the 2nd cup of flour and mix
- After it’s mixed together add the 3rd cup of flour and blend
- Now add 1/2 cup of flour and blend to see if this is enough flour
- If the mixture doesn’t pull from the sides of the bowl and form a ball, add another 1/2 cup of flour
- Mix until the mixture forms a ball
- Roll out the dough and cut using your favorite cookie cutter
- Bake at 350 degrees for about 13.5 minutes, depending on the size of your cookies. If the cookies are large, like my little chickens above you’ll need to leave them in around 14.5 minutes. Small or mini cookies will be closer to 11-12 minutes. A good rule of thumb is, when the cookies aren’t shiny anymore, they’re done.
I created a video of the mixing process that I put on my Youtube channel. Here is the link: Perfect No-Spread Sugar Cookies
To freeze or not to freeze…
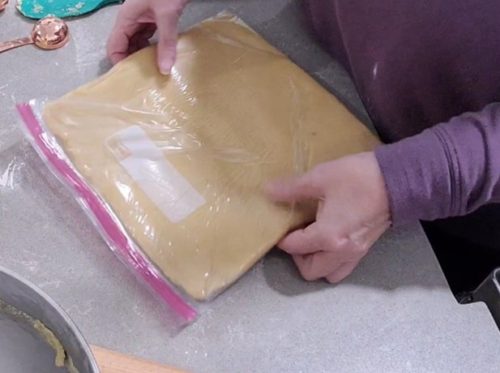
If you happened to watch my video, you can see I’m a messy baker! So what I like to do is, make several batches of dough while I already have the kitchen in a mess. I often don’t bake my cookies the same day that I make the dough. Instead, I freeze it. The dough freezes beautifully. And to save room in the freezer, I roll the dough into 1 gallon ziploc baggies. Works great! When you’re ready to bake, take the baggie out of the freezer, let it thaw and it’s ready to go.
I truly hope you find this to be the perfect no-spread sugar cookie recipe for you!
Happy tinkering,
Susan
The Perfect No-Spread Sugar Cookie Recipe
Ingredients
- 2 sticks salted butter
- 3/4 cup light brown sugar
- 3/4 cup granulated sugar
- 2 eggs
- 2 tsp butter vanilla emulsion
- 1 tsp vanilla extract
- 3.5 - 4 cups all purpose flour
Instructions
- In a stand mixer, blend the butter until creamy
- Add the light brown sugar and granulated sugar
- Mix until combined and then add the 2 large eggs
- Add in the 2 tsp butter vanilla emulsion and 1 tsp vanilla extract
- Mixture should be well blended
- Add 1 cup of flour and mix thoroughly
- Add the 2nd cup of flour and mix
- After it’s mixed together, add the 3rd cup of flour and blend
- Now add 1/2 cup of flour and blend to see if this is enough flour
- If the mixture doesn’t pull from the sides of the bowl and form a ball, add another 1/2 cup of flour
- Mix until the mixture forms a ball
- Roll out the dough and cut with your favorite cookie cutter
- Place the cookies on a parchment paper lined cookie sheet
- Bake at 350 degrees for about 13.5 minutes, depending on the size of your cookies. If the cookies are large, like my little chickens above you'll need to leave them in around 14.5 minutes. Small or mini cookies will be closer to 11-12 minutes. A good rule of thumb is, when the cookies aren't shiny anymore, they're done.

Thank you for the recipe! Do you use the butter straight from the refrigerator it is it room temp?
I let the butter soften first. I should have mentioned that in the recipe!
If I wanted to add in chocolate chips or peppermint candy pieces, what step do you think would be best to add them?
I would probably add after all the ingredients are incorporated and the dough is pulling away from the sides. Good luck! Let me know how it turns out.
What is butter vanilla emulsion.? Is there a substitute?
An emulsion is a stronger version of an extract. Extracts are diluted with water or alcohol. You can substitute with an extract, but the flavor will be just a bit different.
Can I use all white sugar instead of light brown sugar? What would be the best benefit of using both? Thanks!
I would imagine you can use all white sugar. I like brown sugar just because it has a richness of flavor that white sugar doesn’t have, but I think it’s personal preference.
How many cookies does this recipe make?
Hi Isabella,
It totally depends on the size of your cookie cutters and how thick you roll the dough. An average cutter usually gets me around 3 dozen cookies.
Enjoy!
I didn’t see a video, so anyway, I’m wondering about the baggies for the freezer. Out of your recipe, would two 1-gallon Ziploc bags be enough for this recipe?
Yes, that will work great.