
Some recipes I make because they mean something to the people I love, which is how this recipe came to be.
Every year during the holidays, my brother talks about Aunt Cecil’s mini pecan pies. They were one of his favorite holiday treats. The only problem was that I didn’t have her exact recipe. I found her long lost green chili recipe earlier this year but if she wrote down the pecan pie recipe I haven’t come across it yet.
Even so, I finally decided to surprise him and I gave it a shot. He remembered she made a homemade crust (no surprise there) that called for cream cheese…but being the shortcut tinkerer that I am, I used store bought refrigerated pie crust.
I gathered the ingredients, trusted my instincts, and hoped I could come close. Fortunately, they turned out better than I imagined. They were a rave! My brother mentioned that he liked the pie crust even better than the homemade. He said it was much lighter. All in all, I think I did Aunt Cecil proud.
Just a heads-up: This post may contain affiliate links, which means I may earn a small commission if you purchase through them — at no extra cost to you. Thank you for supporting The Tinkering Spinster!
A Bite-Sized, Nostalgic Treat
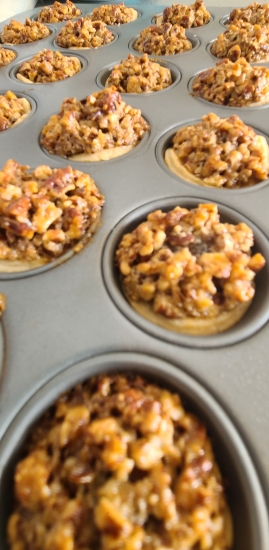
These mini pecan pies are everything you want them to be: gooey, sweet, caramel-y, and just the right size for popping onto a dessert tray. They have the familiar flavor of a traditional pecan pie, but the mini size makes them easier to serve, easier to store, and easier to enjoy without committing to a full slice.
Even better, they’re simple enough to make on a weeknight and special enough for the holidays. This is the kind of recipe that fits right into your family traditions, whether you’re making a full dessert spread or just filling the house with something sweet and nostalgic.
Why You’ll Love This Recipe
These mini pies are popular for many reasons:
- They taste like a full-sized pecan pie.
- They bake quickly.
- They freeze well.
- They look great on dessert trays.
- They include an optional splash of bourbon for warm flavor.
In addition, they are easy enough for beginners.
What Makes These Mini Pecan Pies So Good
This recipe works because every ingredient plays a specific role in creating that gooey, caramel-like filling and the perfectly flaky, bite-sized crust. The mini size lets the pies bake quickly and evenly, while the filling settles into a smooth, custard-like texture as it cools — no cracking, no runny centers, no guesswork.
Here’s how everything comes together:
Refrigerated Pie Crust – Using store-bought crust keeps this recipe simple without sacrificing flakiness. Rolling it just slightly thinner makes the pies light and crisp, and cutting the dough into circles gives you the perfect ratio of crust to filling in each bite.
Brown Sugar – adds warmth and molasses notes that pair perfectly with pecans. Combined with corn syrup, it creates that gooey, caramel-like center people expect in a pecan pie.
Butter – enriches the filling and helps everything meld together. It also gives the pies a smooth, velvety texture once cooled.
Eggs – are what transform the filling from syrupy to custardy. They help the mini pies bake evenly and set softly without drying out.
Chopped Pecans – are ideal for mini pies because they distribute evenly and ensure every bite has the right amount of crunch. If you prefer a more rustic look, pecan halves work too.
Bourbon (Optional, but delightful) – adds warmth and depth without making the pies taste boozy. It rounds out the sweetness and elevates the flavor just enough to make these feel special.
Vanilla + Salt – Vanilla enhances the caramel notes and salt keeps the filling balanced.
Overall, the combination of the simple crust, rich filling, and perfectly portioned size gives you adorable little pies that are easy to make, easy to share, and always a hit…even with picky family members who grew up on the original.
Tips for Perfect Mini Pecan Pies
- Keep the Crust Cold
- Cold crust holds its shape better when pressed into the pan. If it softens, pop it in the fridge for a few minutes.
- Don’t Overfill the Cups
- The filling puffs slightly as it bakes. Filling too high causes overflow and sticky edges.
- Use a Tamper
- A tamper tool presses the dough evenly into each muffin cup, giving you a neat, bakery-style shape.
- Stir Before Scooping
- The pecans float in the syrup mixture, so make sure you stir the bowl often to keep things evenly distributed.
- Let Them Cool Completely
- The filling sets as it cools. Removing them too early can tear the crust.
Ingredients
- 1 cup chopped pecans
- 2/3 cup dark corn syrup
- 1 cup light brown sugar
- 4 tablespoons melted butter
- 2 eggs
- 1.5 tablespoons bourbon (optional)
- 1 teaspoon vanilla extract
- 2 packaged pie crusts
- Pinch of salt
Step-by-Step Instructions
1. Preheat the oven
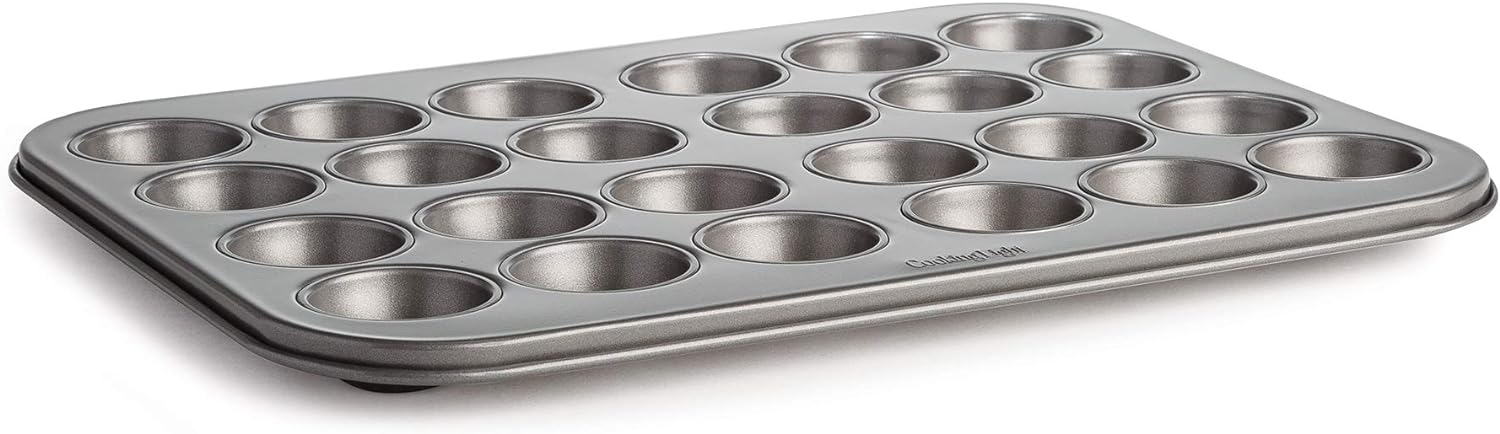
First, preheat your oven to 350°F. Spray a mini muffin pan with nonstick spray so the pies release easily. I use this 24-cup mini tart pan I found on Amazon.
2. Cut the pie crusts
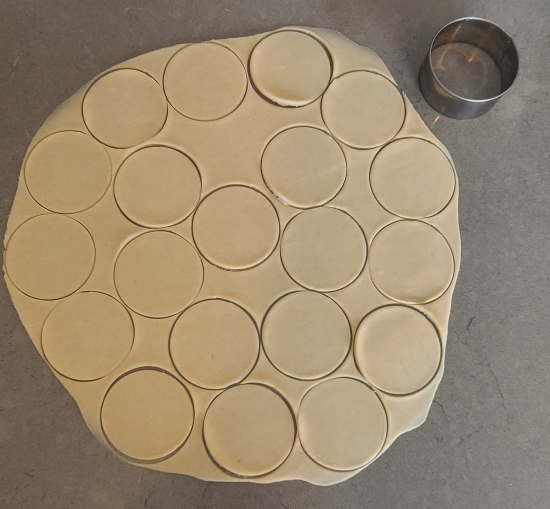
Next, roll out the pie crust and, using a rolling pin, gently roll it just a bit thinner. Cut circles using a 2-inch cookie cutter, or similar size glass.
3. Press the dough
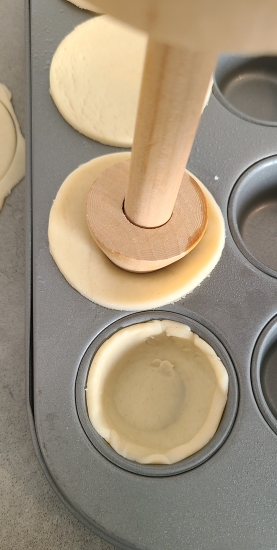
Place each dough round into a muffin well. Then press the dough into the pan. A tamper works well because it creates even thickness and smooth edges.
4. Mix the filling
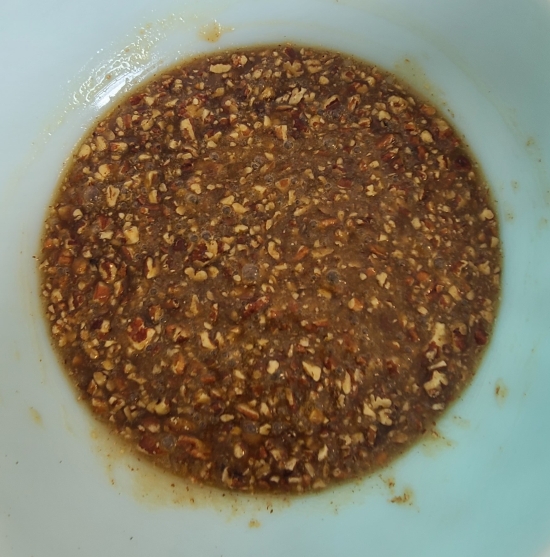
In a medium bowl, whisk together the brown sugar, eggs, dark corn syrup, melted butter, bourbon, vanilla, and salt. After that, stir in the chopped pecans.
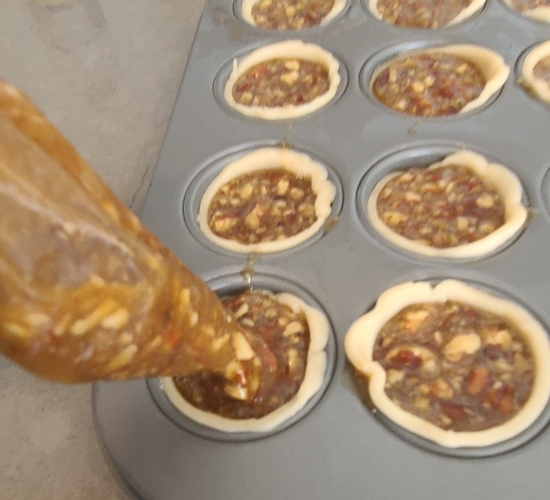
5. Fill the crusts
Add about 1 tablespoon of filling to each crust. Do not fill them to the top because the mixture rises as it bakes. Easy hack: Use a pastry bag!
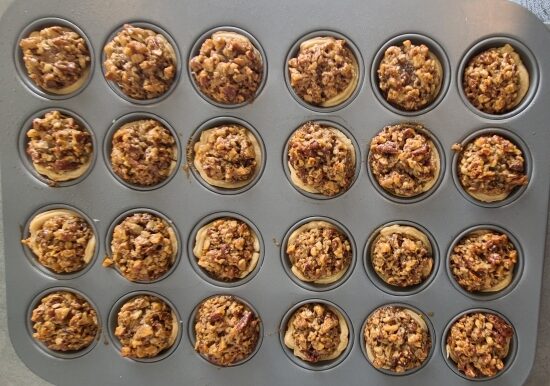
6. Bake the pies
Bake for 18–20 minutes. The pies are done when the centers are set and the crust edges turn golden.
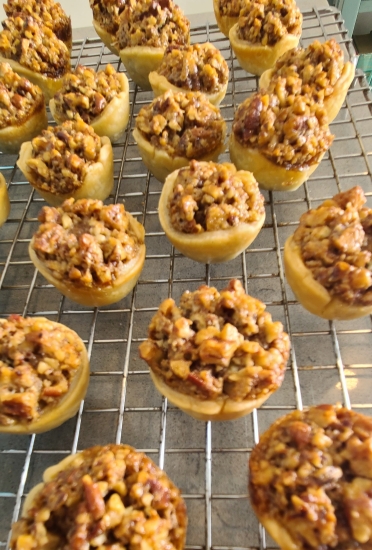
7. Cool and serve
Finally, let the pies cool in the pan a bit and then transfer them to a baking rack to finish cooling. Serve warm or at room temperature.
Troubleshooting Guide
- Filling Is Runny
- This usually means the pies are underbaked or not cooled fully. They set as they rest.
- Crust Shrinks
- The dough may have been stretched too much or too warm. Keeping it cold fixes this.
- Pies Won’t Release
- Make sure to spray the pan well. A thin knife can gently lift stubborn edges.
- Filling Overflowed
- They were overfilled. Fill just below the top next time.
Storage and Freezing
- Room Temperature
- Keeps for up to 3 days in an airtight container.
- Refrigerator
- Stays fresh 5–6 days, which is great for holiday planning.
- Freezer
- Freeze fully baked pies for up to 2 months.
Thaw at room temperature before serving.
- Freeze fully baked pies for up to 2 months.
- Reheating
- Warm for 5–7 minutes at 300°F for that fresh-baked taste and aroma or serve room temperature.
- Make-Ahead for Holidays
- Make the full batch a week before Thanksgiving or Christmas, freeze them, and thaw the night before serving. They taste exactly the same.
FAQs
- Can I make these without bourbon?
- Yes! They’re delicious with or without it.
- Can I use light corn syrup instead of dark?
- You can, but the flavor won’t be as deep.
- Can I use homemade pie crust?
- Absolutely — just roll it thin and cut the same size circles.
- Can I double the recipe?
- Yes. Everything scales perfectly.
- Can I make full-size pie instead?
- You can turn this filling into a 9-inch pie. Just bake 45–55 minutes.
Final Thoughts
Mini pecan pies work well for parties, potlucks, or dessert boards. They also pack nicely into gift boxes during the holidays. Because they are small, people can enjoy one without committing to a large slice of pie.
If you enjoy easy, nostalgic desserts, save this recipe or follow along for more treats from The Tinkering Spinster kitchen.
Happy tinkering,
Susan

Mini Pecan Pies — A Bite-Sized Holiday Classic
Equipment
- 1 Mini Muffin Pan
- 1 2-inch round cookie cutter
- 1 Tamper
- 1 Mixing Bowl
- 1 Spoon
- 1 Small Spatula
- 1 Rolling Pin
- 1 Measuring Cups and Spoons
Ingredients
- 1 cup Chopped Pecans
- 2/3 cup Dark Corn Syrup
- 1 cup Light Brown Sugar
- 4 tbsp Melted Butter
- 2 Eggs
- 1 1/2 tbsp Bourbon (Optional)
- 1 tsp Vanilla Extract
- 2 Pie Crusts
- Pinch of Salt
Instructions
- Preheat your oven to 350°F. Spray a mini muffin pan with nonstick spray so the pies release easily.
- Spread out the pie crust and, using a rolling pin, gently roll it just a bit thinner. Cut circles using a 2-inch cookie cutter, or similar size glass.
- Place each dough round into a muffin well. Then press the dough into the pan. A tamper works well because it creates even thickness and smooth edges.
- In a medium bowl, blend together the brown sugar, eggs, dark corn syrup, melted butter, bourbon, vanilla, and salt. After mixed, stir in the chopped pecans
- Add about 1 tablespoon of filling to each crust. Do not fill them to the top because the mixture rises as it bakes. Easy hack: Use a pastry bag!
- Bake for 18–20 minutes. The pies are done when the centers are set and the crust edges turn golden.
- Let the pies cool a bit in the pan and then transfer them to a baking rack. Serve warm or at room temperature
