
Buying a fixer upper is one of the most rewarding journeys you can take as a homeowner. Every house I’ve ever owned started out as a fixer upper. The idea of turning an outdated or neglected property into your dream home is exciting…but it can also feel overwhelming. Where do you even begin? How do you budget? And how do you make sure you end up with a home that’s both functional and beautiful? Yikes!
The secret is to approach your remodel in stages: tackle the big projects first, and then gradually move into cosmetic updates and decorating. With patience, planning, and a little creativity, you’ll transform a diamond in the rough into a space that reflects your style and meets your needs.
Follow along as we go through a step-by-step guide to remodeling a fixer upper—from budgeting, to the heavy lifting of renovations all the way to the fun of decorating.
Assess the Project and Make a Budget
Fixer uppers almost always come with hidden surprises. Before you take the plunge, make sure the bones of the house are solid. Hire professionals to evaluate the home.
The fundamentals
- Foundation and roof – are there cracks, leaks, or sagging?
- Plumbing and electrical systems – do they meet current safety codes?
- HVAC – is it efficient, or will it need replacing?
- Windows and insulation – will they keep energy costs under control?
The layout
- Are there any walls you want to open up or close off?
- Keep load bearing walls in mind if you’re wanting to open up a space.
- Is there enough light in each room? Do you want to add windows or skylights?
- Sometimes HOAs have to approve new windows
Break the work into categories
- Structural fixes/updates
- Kitchen and bath remodels
- Cosmetic upgrades (paint, flooring, fixtures)
- Decorating and furniture
Determine who will do the work
For work like electrical, plumbing and structural changes, a licensed contractor is the best way to go. For the cosmetic items like painting, flooring, cabinet installation and tile, if you have a handyman or the skills to DIY, it can be a big cost saver. Things to consider:
- Do you have the chops to do any of the work yourself?
- Will you need to hire contractors to complete the remodel?
- If you don’t already have workers in mind this will definitely slow down the process but it’s not a show stopper.
- If you’re hiring unknown workers, get more than one bid on the work and be sure to check online reviews.
- Will you have to live in the home during the remodel, or can you remodel it first and then move in?
- You might need to factor in temporary housing costs in the budget
- General contractors will manage everything for you if you’d like. They can serve as the Project Manager.
- This comes with additional cost. If you buy everything through them, they will take a markup, which includes a markup on the labor costs of the subcontractors.
- Consider being your own Project Manager. Hire your own electrician, plumber, floor installer, painter, handyman to keep costs down.
- This requires some organizational skills and can be time consuming but it’s worth it if you feel you can take it on. I manage all my own projects.
Create a budget
Once you know the “must-do” repairs/updates, create a realistic budget of what those would cost and factor that into the price of the home. It’s always good to factor in a 10-15% contingency as well since fixer uppers often have little hidden surprises.
Here are some ballpark costs for a 1,700 sq ft house using moderate materials (includes labor).
- Kitchen – $25,000
- Master Bath – $7,000
- Hall Bath – $5,000
- Flooring – $10,000
- Paint – $5,000
- Demo – $2,000
After you’ve run the numbers, is it still a good deal? If the numbers work and you’re up for it, yay! Time to buy a house!
Start with a Clear Vision
Before you begin, take time to picture the end result. What do you want your home to look and feel like? Do you see it as a modern farmhouse, a cozy cottage, or a sleek contemporary space? If you’re needing some ideas or inspiration, Pinterest and Houzz are great resources to help create your vision.
Having a clear vision helps you stay focused when decisions get overwhelming, and it ensures your choices flow together into a cohesive look.
Tackle the Big Renovations First
Remodeling works best when you layer projects in the right order. Start with the messy, large-scale changes before moving on to details.
- Demo: Tear out old carpet, dated cabinets, or non-load-bearing walls.
- Structural repairs: Repair water damage, get rid of that popcorn ceiling, and replace unsafe wire.
- Layout changes: Knock down walls for an open-concept kitchen, add a half-bath, or finish the basement.
This first phase is messy and chaotic, but once these big projects are complete, you’ll have a solid foundation to build upon.
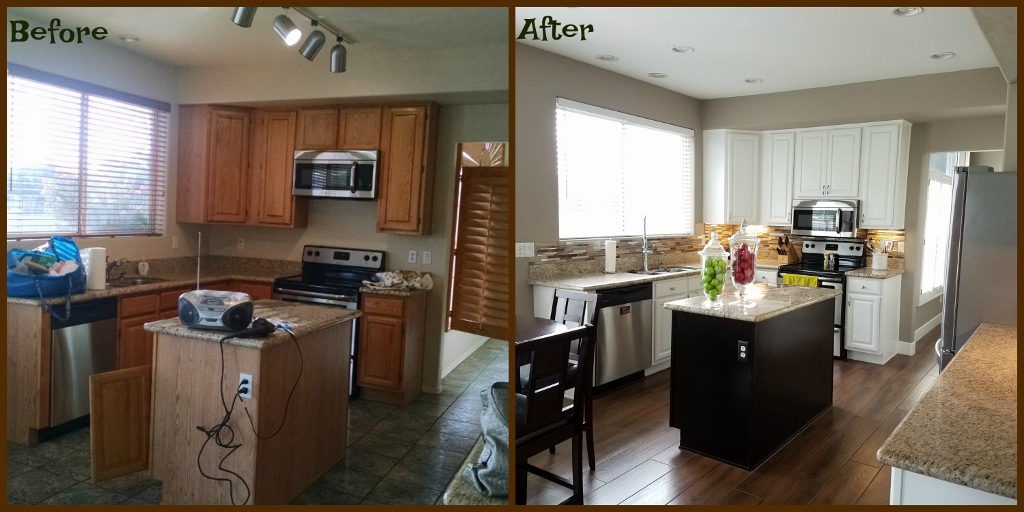
Remodel Kitchens and Bathrooms
If you’re going to splurge anywhere, splurge here. Kitchens and bathrooms not only make daily life more comfortable but also add the most resale value. I always like to renovate the guest bathroom first. That way, everyone will have access to a bathroom while the renovation is in progress.
Kitchen updates may include:
- Installing new cabinets or refacing existing ones
- Choosing durable countertops (quartz or granite)
- Adding a stylish backsplash
- Upgrading to energy-efficient appliances
Bathroom updates may include:
- Replacing an outdated tub with a modern walk-in shower
- Adding new vanities and mirrors
- Installing fresh tile and lighting for a spa-like feel
Refresh with Paint and Flooring
Now comes one of the most satisfying stages: bringing the home back to life with new finishes.
- Paint: My biggest recommendation here is to test your paint first. Buy a sample size of several colors and put them on the wall next to each other. Look at them during the day and at night. Paint looks very different on a wall than a 2 inch paint strip. The last thing you want is to regret your palette decisions!
- Flooring: Some decisions to make when choosing flooring:
- How long do you think you’ll be living in the home? This may determine the durability decision, tile/hardwood vs carpet
- Do you want a cohesive look throughout the house?
- Carpet vs tile vs hardwood floors. 3 very different choices, with 3 different budgets. Carpet is the most economical but wears out the quickest.
- If you’re not using the same flooring throughout the house, be sure the transition from room to room would look cohesive.
- Trim and doors: Updating baseboards, crown molding, or interior doors gives your home a polished look but can be costly so consider this a “nice to have” decision.
In my last remodel, I did the same flooring throughout the house with one exception, the hall bathroom. I used the same tile on the floor and shower, which blended nicely with the flooring throughout the house. Remodeling the Guest Bathroom
Update Fixtures and Lighting
- Fixtures are like jewelry for your home—they’re small but transformative.
- Swap out old brass doorknobs for matte black or brushed nickel.
- Replace dated light fixtures with sleek pendants, sconces, or chandeliers.
- Upgrade faucets and cabinet hardware to instantly modernize the space.
- Install dimmer switches or smart bulbs for customizable ambiance.
I’ve mentioned in other blog posts that Home Depot and Lowes are great places to shop for affordable, stylish fixtures and lighting. Some of these would also fit into the “nice to have” category. Make sure you’re within budget on the essentials before updating the fixtures.
Boost Curb Appeal
- First impressions matter. Your home should look as inviting on the outside as it does on the inside.
- Repaint the siding, trim, or front door.
- Add landscaping: fresh sod, flower beds, or a few well-placed trees.
- Install modern house numbers and outdoor lighting.
- Repair or replace the driveway and walkways.
- A bold front door color (like navy, red, or teal) is an inexpensive way to add personality and charm.
Bring It All Together with Decorating
Let the real fun begin! Decorating is the moment when your fixer upper finally feels like home. Decorating is about layering function with personality.
- Furniture: Choose pieces that fit the scale of each room. A large sectional might overwhelm a small living room, while petite chairs might get lost in an open floor plan.
- Textiles: Rugs, curtains, and throw pillows add softness and warmth.
- Personal touches: Display art, family photos, plants, or books that reflect your personality and style
- Mix and match: Don’t be afraid to combine high-end statement pieces with affordable finds from places like IKEA, Target, or thrift stores.
Take It Room by Room
Decorating the entire house at once can be expensive and overwhelming. Instead, focus on the most-used spaces first—like the living room, kitchen, and bedrooms. Once those are complete, you can slowly add finishing touches to guest rooms, offices, and outdoor areas.
Don’t rush to fill every wall or corner. Sometimes it’s better to live in a space for a while before deciding on the perfect piece of art or furniture.
And don’t forget to shop your own belongings. There might be a candlestick set in your bedroom that would work beautifully in the dining room of your remodel
Enjoy the Transformation
Remodeling a fixer upper is not a weekend project—it’s a journey. There will be dust, delays, and moments when you wonder if it’s all worth it. But once the work is done, you’ll have something truly special: a home filled with character, charm, and your personal touch.
Document your progress with before and after photos. Not only is it rewarding to look back at how far your home has come, but it can also inspire others who are considering tackling a fixer upper themselves.
Final Thoughts
A fixer upper is more than just a house—it’s an opportunity. With a clear vision, a solid budget, and patience to see the process through, you can turn even the most rundown property into a dream home. Take it step by step, celebrate small wins along the way, breathe through the troubles, and before you know it, you’ll be living in your perfect space that tells your story.
I hope this post has taken some of the fear out of buying and remodeling a fixer upper. If you’ve taken the plunge, let me know how it went in the comments below.
Happy tinkering,
Susan
