
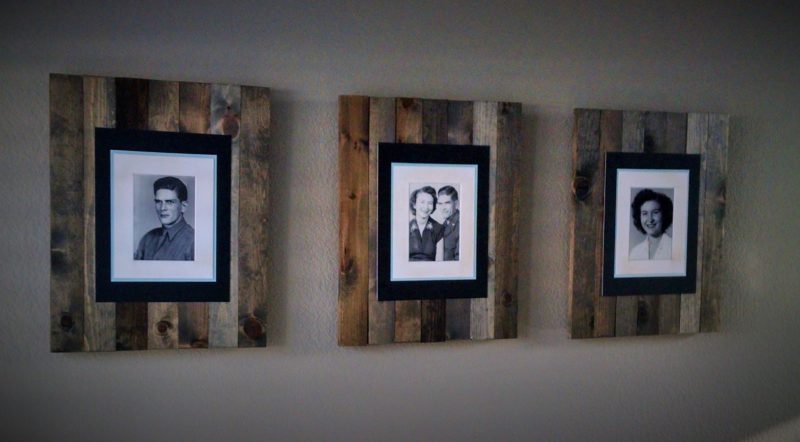
These faux reclaimed wood frames are one of my favorite projects ever. They’re exactly what I was wanting in the dining room. I wanted the rustic look of reclaimed wood frames…without having to go looking for reclaimed wood! And what I found was that stain on plain planks of inexpensive wood can accomplish the look you’re going for beautifully!
I once again hit up Pinterest to find my inspiration and I found a wonderful blog here who had already made a version even better than what was in my head, so I followed her lead.
This post contains affiliate links. See disclaimer here.
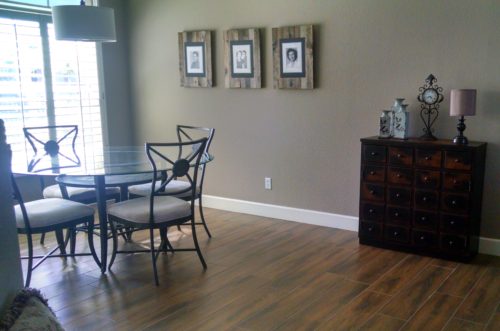
Here’s a sneak peek at the finished project in my dining room. The finished frames are 21″ long by 17.5″ wide.
Here’s what you’ll need (for 3 frames)…
- 3 – white 8 x 10 photo mats (Amazon has a great price on multi-packs)
- 3 – black 11 x 14 photo mats
- 3 – 8.5 x 11 cardstock in the color of your choice to match your decor
- Wood Glue
- Zip Dry Glue
- 6 – 1 x 3 x 8’s (cut into 21″ planks) — Home Depot will cut these for you if you don’t have a miter saw.
- 1 – 1 x 2 x 8 (cut into 15″ planks)
- Minwax Classic Gray Stain
- Minwax Dark Walnut Stain
- Minwax Honey Stain
- Men’s Socks
- Cotton Rags or old T-Shirts (cut into rags)
- Disposable Gloves
- 3 – picture hangers
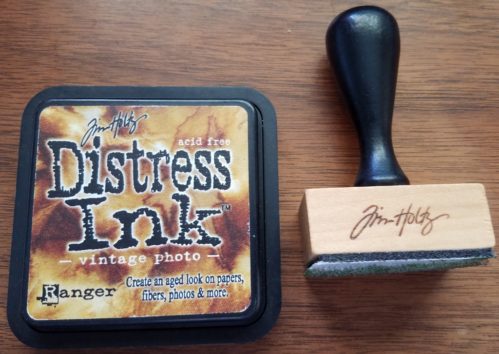
- Tim Holtz Vintage Photo Distressed Ink
- Distress Ink Blending Tool
Here’s how you’ll make them…
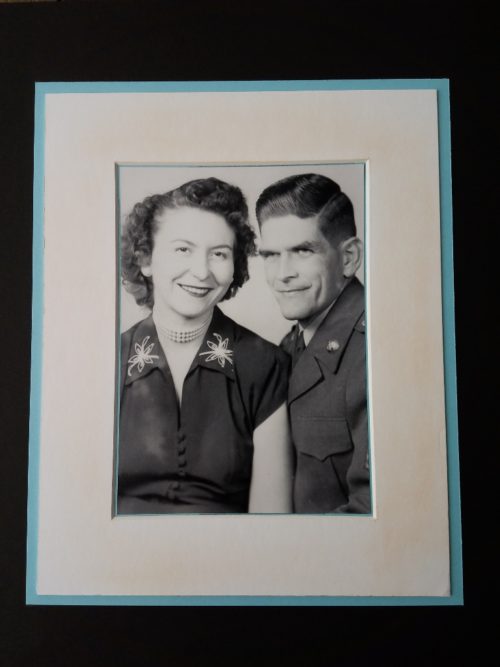
The first thing I did was go to Costco and get photos of my parents blown up to 5 x 7 in black and white. Aren’t they pretty… 🙂

Then it was off to my friendly neighborhood Home Depot. I have a Home Depot about a mile from my house and one of the things I take advantage of …alot…is their online ordering. You can order your in-stock items online, pay for them online, and they will gather your items up and text you when your order is ready to pick up at the front of the store. Love that! Even though I’ve been in that store what feels like a million times, I don’t know what aisle everything is in so instead of wandering around the store (and including impulse items in my order!) I just pick up everything from the front desk. I’m in and out in less than 5 minutes!
The wood…
The beauty of these frames is that you use cheap planks of wood to make them! I bought the least expensive 1 x 3 x 8s…which you might already know are really .75 x 2.5, just like a 2 x 4 is really 1.5 x 3.5.
Your daily trivia: When a board is first rough sawn from the log, it is a true 2 x 4, but the drying process and planing of the board reduce it to the finished 1.5 x 3.5 size. I can’t tell you how many times I have forgotten to factor that in when I’ve calculated how much wood I need for a project…
Just a note, if you have Home Depot make the cuts for you, they don’t guarantee the precision of the cut. They’re rough cuts…but in this case that’s not a bad thing. You’ll see in my photo that they are not all perfectly 21 inches long but I think that adds to the rustic look of them. One of my 1 x 3s was a little warped too and even that added to the charm.
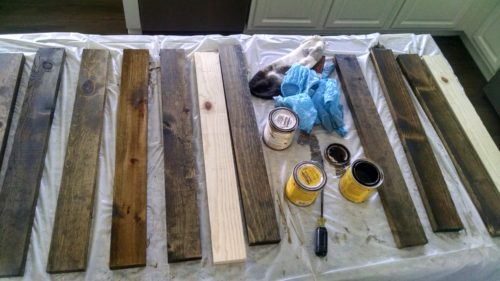
Now for the staining…
What I love about this staining project is that you can’t mess up! Really! Each plank will look just a little bit different and that’s exactly what you’re looking for.
To stain a plank just put a glove on and a cotton sock over the glove. Dip your hand in the stain and just rub it on the plank all over, including the sides and edges. Then take a cotton cloth or t-shirt and wipe the stain off.
Since I had 21 planks to play with I divided them into three piles of 7.
- Stain 7 planks in one coat of Classic Grey, 7 in Dark Walnut and 7 in Honey.
- Set two of each color aside as “done. That will leave you with 5 of each color.
- Add a second coat of stain to two more planks of each color and set those aside. That leaves you with 3 of each color.
- Now start mixing color. For instance, on top of the first coat of one of the Honey planks, add Classic Gray… and so on. There is no right or wrong combinations. You can leave the stain on for a little longer on some to make them darker too.
- If you end up with a piece you just really don’t like, flip it over and start over on the other side!
What you get at the end of the process is a pile of wood that looks remarkably like reclaimed wood!
The assembly…
Once they are all stained, line them up and decide which 7 pieces you like for each frame and in what order. Again, no right or wrong. Just vary them.
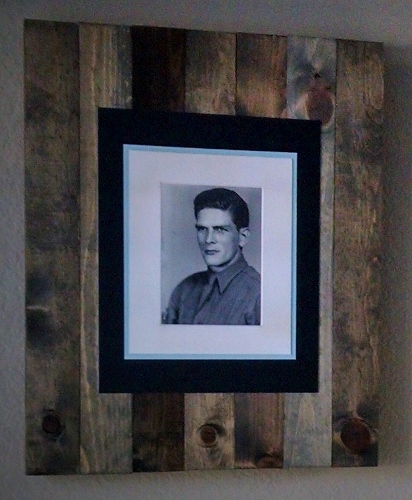
Here’s an up close example of the random order of one of the finished frames.
Once you’ve decided the look of each frame it’s time to glue them all together with your wood glue. Just put a small bead of glue on the sides of each adjoining piece of wood and press together.
Random thought: I bet I have 5 bottles of wood glue in various places in the house/garage. I never put it back in the same place twice, then I can’t find it and I go out and buy more! Sigh… It’s hard to be me.
Let the glue dry for a few hours. Then take two pieces of 1 x 2’s and glue them to the back for support, near the top and bottom. The top plank is also where I put the picture hangers.
![]()
Now back to the mats and cardstock…
I raided my stash of cardstock (seen here) and when I found the shade I wanted I cut the cardstock down to 8.5 x 10.5. That gave me a quarter of an inch as a border for the white mat. Before I glued anything I laid the mats and photos on the frames, but I didn’t like what I saw. The white really popped out…and not in a good way. It made the frame look too “new”. So I went back to my craft room stash and got my Tim Holtz Vintage Photo Distressed Ink pad and Blending Tool and just added a little ink on the white mats to dull them a little, making them look distressed. I used a very light touch. In fact, I did it on the back side of the mat first to see if it was the look I was going for… If you’ve never used the distress tool I highly recommend practicing a little to make sure you have the hang of it.
The last step is to glue the mats/photos together and then attach them to the frame. I am a fan of Zip Dry when gluing paper to paper, so that’s what I used to attach the mats to the photos and cardstock. Once the mats, photos and cardstock were attached to each other I just used my wood glue to attach them to the frame.
This project was so much fun. In fact I liked it so much I’m currently using the same “reclaimed wood” concept on a headboard I’m working on. I’ll post it when I’m done… I also used it for a nightstand makeover for my guest bedroom you can find here.
If you have any questions or comments on these faux reclaimed wood frames, just leave them below. I’d love to hear from you.
Happy tinkering,
Susan
