
Cabinet staining is a great alternative to painting. I have done both and the process is actually very similar. I was inspired to tackle cabinet staining by the blog found here.
This post contains affiliate links. See my disclosure here.
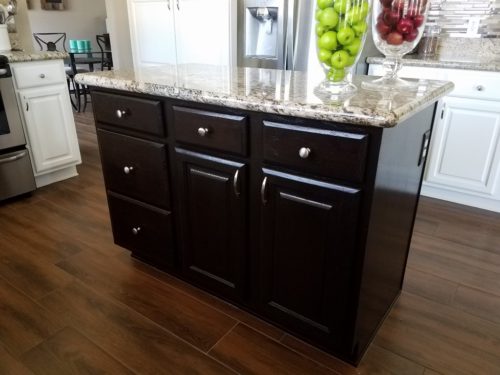
A couple of years ago I bought a fixer-upper in desperate need of some TLC and one of the things it needed was cabinet makeovers throughout the house. The house needed so much work that I needed to save money where I could so instead of replacing perfectly good cabinets I decided to stain the cabinets in my bathrooms and my kitchen island, and then paint the cabinets in the kitchen. I love how everything turned out. Cabinet staining is alot of work but it’s not difficult. Plus it’s inexpensive and it’s fun to do! You can follow these links to see the whole bathroom makeover (here) and the kitchen makeover (here) but here’s a sneak peek at the finished cabinets in each room.
For all you ladies out there wondering if you could do this yourself, the answer is ABSOLUTELY YES! I did it by myself and it turned out great. But if you have a helpful husband, put him to work! It will go faster and you can tell him what to do. Bonus!
As you can see, cabinet staining makes a huge difference in the overall look of a room. It gives it a high-end, updated look. So does cabinet hardware. I bought inexpensive, generic hardware and it still made a huge difference.


If I had it to do all over again, I would have done a test piece first. There’s a place here in Phoenix that sells salvage cabinets for $4 and in hindsight I should have stained one of those first. I would recommend that to anyone trying this for the first time. I’m totally happy with the final results, but it could have gone very wrong and then I’d have had to figure out a way to fix the mess. It’s not that the process is difficult but it’s a commitment. The first piece I did was the kitchen island. What was I thinking!? After that first coat on that first wall there was no going back!

So, now that it’s all done would I do it all over again? I would! So now let’s go over the details.
Here’s what you’ll need…
- General Finishes Java gel stain
- General Finishes satin top coat
- disposable gloves
- cotton socks
- a paint stirrer (if you ask nicely the kind people at Home Depot or any paint store will give you a few to keep on hand)
- Krud Kutter or similar cleaner
- old t-shirt or cotton rags
- a tack cloth
- a drop cloth
- painter’s tape
- sanding block or paper (120 grit)
It’s all in the prep…
The prep of the cabinets is a necessary evil. Stain won’t stick to cabinets that haven’t been cleaned and sanded! Trust me on this!
We interrupt this broadcast to bring you a little rant…
Side story: My stairs had to be replaced before I moved in and I took the opportunity to have the railing stained at the same time. Like the cabinets, it was a light oak and that didn’t fit into my overall vision. I hired a company to do the work so I could remain focused on other projects. They did no prep before they began staining and I questioned them about it, knowing it doesn’t matter if it’s cabinets or banisters, you have to prep your surface! They told me they used some new stain that doesn’t need prep. I was very skeptical, and it turns out I had good reason to be! The stain started peeling off within a day! (Then they decided to “fix” it by adding more stain!!! Aaagghhh!!)

Long story short…I sanded down the banister, removing about 5 coats of stain, and then restained it myself. The moral of the story…be sure to prep your surfaces!
Now back to our regularly scheduled program…
To prep your cabinets:
- Remove the hardware from the cabinets. Don’t lose it!
- Use painters tape to protect the cabinet frame. You don’t want to see blotches of stain on the interior of your cabinet when you’re all done and open the cabinet doors. Also tape the area that attaches the drawer front to the drawer frame.
- Using an old t-shirt or cotton rags and Krud Kutter or a similar cleaner, clean each cabinet. If there are stubborn areas, try using a scouring pad. Allow to dry overnight.
- Sand each cabinet and wipe off with a tack cloth. Make sure to remove all the dust.
Now the fun part…
The staining process wasn’t difficult but it was time consuming. Each cabinet took 3 coats front and back and each coat had to dry overnight. I let the last coat dry for 48 hours before I put the topcoat on. That might be overkill but I wanted to be sure they were completely dry and ready for the next step.
What makes this different than your typical staining project is that you don’t wipe off the stain after you apply it. To stain the cabinets use your paint stirrer to stir the stain until it is creamy. Put on your gloves and then a cotton sock over the glove of your dominant hand. Scoop a little stain onto your sock and spread it over your cabinet or drawer like you were spreading butter in a baking pan. Use enough to cover the entire surface, working with the grain. Remember, don’t wipe it off.
WARNING: The first coat isn’t pretty. You may think you’re doing it wrong but here’s what my first coat looked like.

Once it’s coated, leave it alone! Your instinct will be to fuss with it, add more stain, then let it dry for a little bit and add even more stain to even it out. Stop! Step way from the cabinets! Wait 24 hours to add your next coat.
After two coats it’s going to look alot better, but will still be a little streaky.


